In this photography lesson I will show you a simple method of testing auto focus in your camera, see if you have front or back focusing problem and how to do an AF fine tuning.
INFORMATION FROM THE VIDEO:
Your camera can have back focusing or front focusing problem.
If you focus on the eyes with the wide aperture (let assume around f/2), your DOF should be as it is show in this image:

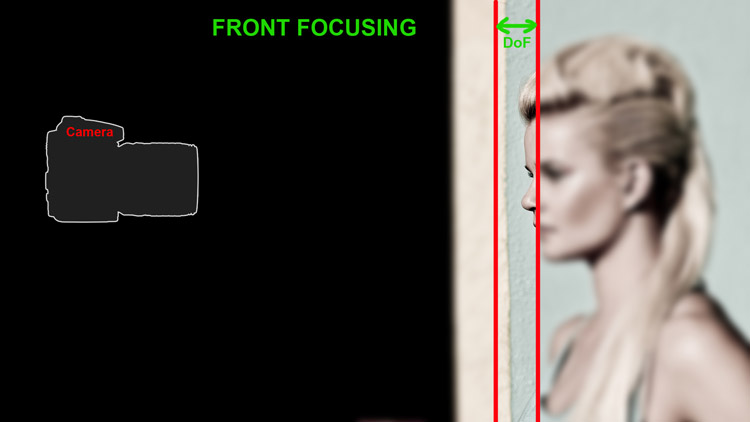
If you are focusing on the eyes and you get just nose in focus, you have a FRONT FOCUSING problem as it is shown in this image below:
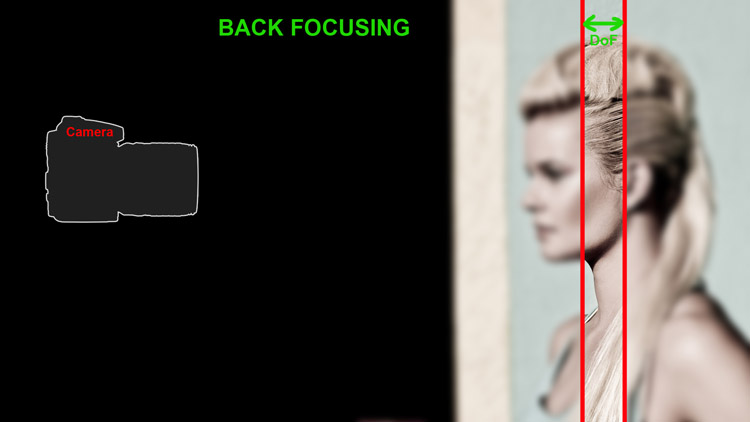
If you are focusing on the eyes and you get ears and hair in focus instead, you have a BACK FOCUSING problem as it is shown in this image below:
Before you do any fine-tuning try to reset your camera first. It might help to fix your focusing problem:
1. Put camera on Auto
2. Go into the Shooting Menu and set it back to default
3. Go into Customs Menu and set it back to default
(Do steps 2 and 3 even if you have never changed anything).
4. Now do a full camera reset (the 2- button reset as shown in your manual) and hold for five seconds.
5. Turn camera off and on again and see if things improve.
Try to do those steps with the lens, you have focusing problems with.
The following are the cameras, which have a focusing adjustment feature:
Nikon
- D7000
- D300
- D300s
- D700
- D800
- D800E
- D4
- D3
- D3x
- D3s
Canon
- 7D
- 50D
- 1Dx
- 1DsMk3
- 1DMk3
- 1DMk4
- 5DMk2
- 5DMk3
Sony
- SLT-A77
- A850
- A900
Olympus
- E-5
- E-30
- E-620
Pentax
- K-5
- K7D
- 645D
- K20D
- K2000
- K200D
Different manufacturers call this feature differently:
Nikon: AF Fine Tune
Canon: AF Micro Adjustment
Sony: AF Micro Adjustment
Olympus: AF Focus Adjust
Pentax: AF Fine Adjustment
AF Fine Tune in Nikon D7000:
Go to: Menu -> Setup Menu -> AF fine tune
– Set AF fine tune to “On”
– Go to Saved Value and adjust your focus:
“+” – “front focus situation” – move the focused point away from the camera
“-“ = “back focus situation” – moves the focus closer to the camera
HOW TO TEST AF FOCUS IN YOUR CAMERA:
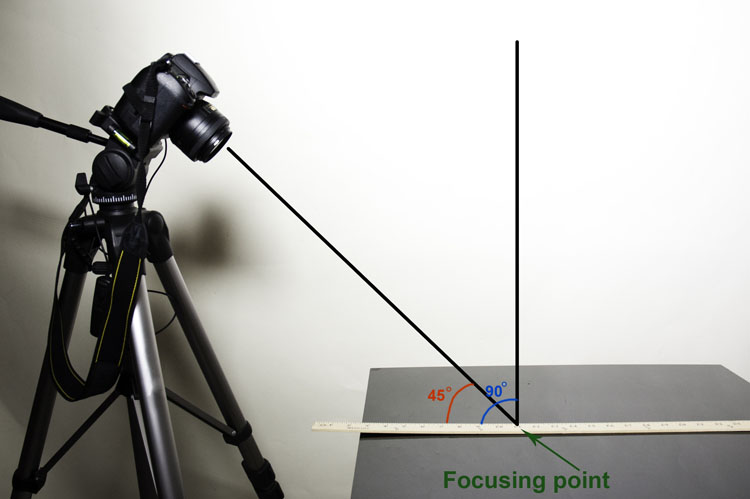
- Get a ruler and put it on the table.
- Choose a target line on the ruler to focus on.
- Set your camera on a tripod and point at the ruler at 45 degrees angle.
- The camera should be far enough from the ruler to be able to auto focus.
- Use the widest aperture (smallest F-number).
- There should be a good even light and proper exposure.
- Use S-AF/One Shot Single Point focusing mode.
- Make sure that your center focus point is set directly on the target line.
- Take a picture using auto focus. See if your target is in focus. Try a few time.
You can also use a devise called Datacolor SpyderLensCal SLC100 for more precise fine-tuning:
Where can I find Lesson 22. It would be very helpful if all the lessons were listed from Lesson 1 to Lesson 50. Also, one should be able to enter the lesson number in the search box and easily find whatever lesson or topic they are looking for.
Thanks
Hi thanks for this, thought I had a problem with my new camera until I tried this and adjusted the Fine tune to suit my lenses. Camera is not working better. Thanks again, looking forward to the rest of your lesson videos.
Hi that should read “Camera is now working better”
Excellent